


Sony Xperia Ray user now can update to the latest Android 4.2.2 jelly bean firmware. This upgrade we use CyanogenMod 10.1 (CM10.1) custom ROM. Sony mobile stop updating this device after release official ICS firmware. Still there are skillful developer make after market for Xperia Ray.
Android 4.2.2 Xperia Ray CM10.1 ROM is an Android open source project (AOSP) based firmware. It doesn’t include Google and Sony mobile applications and services. If you need Sony’s apps such as TrackID, Music Unlimited, you can find them on Google play store. This installation we use Gapps zip file, because of we can install all the necessary Google apps and services.
This custom ROM installation we need to wipe all the user data. Therefore before start the installation, it’s highly recommended to backup all the necessary apps and its data (if you need). This backup should include contacts, SMS, etc.

CM10.1 has its own kernel, it includes CWM based recovery. Therefore you have to unlock the bootloader. In addition to that, currently if you don’t have a custom recovery and root permission. You can follow this tutorial. Because as I mentioned earlier, this kernel (boot.img) has a custom recovery. This Android 4.1.2 ROM developed by the XDA developer iriijo.
Warning!
Installing custom ROM voids the warranty. If your Sony Xperia Ray bricked by following my this tutorial, I can’t take any responsibility. Applying this method at your own risk. If your device bricked you can follow my this unbricked tutorial.
Requirement.
- Backup internal memory [with root| without root].
- Unlock the bootloader [Guide in here].
- Charge the battery minimum 50%.
- Install the ADB and fastboot drivers [Guide in here]
Download.
- CyanogenMod 10.1 Android 4.2.2 ROM for Xperia Ray in here.
- Google apps in here.
- Fastboot file fastboot.
How to update Sony Xperia Ray to Android 4.2.2 Jelly Bean via Installing CM10.1 ROM.
- Uncompress the downloaded fastboot zip file into the desktop.
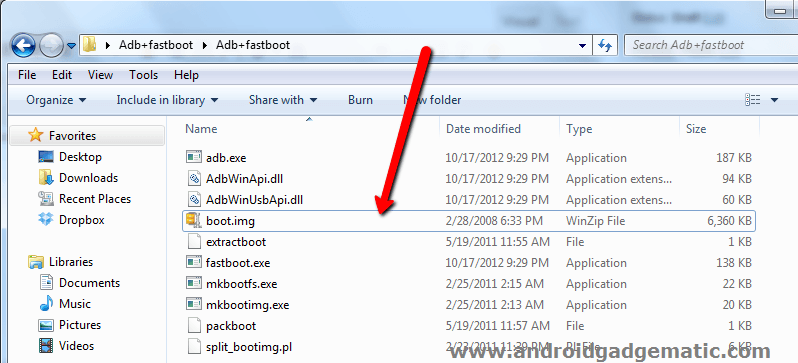
- Extract the downloaded ROM zip file contain “boot.img” kernel file. Save that kernel with the fastboot files. Like following screenshot.
- Copy the ROM and Gapps zip files onto the SD card.
- Power OFF the phone and wait for a few seconds.
- Press and hold the Volume Up key and simultaneously right click inside the fastboot folder.
- Now you can see the Windows context menu just like the following screenshot. If you have a Windows XP computer, you have to follow this method to open the command window and navigate to fastboot folder.
- Click “Open command window here” option.
- Type the following command line and hit the enter key.
fastboot devices
- If it shows a message like “xxx xxxx xxxx fastboot devices”, your computer successfully identified your Xperia Ray as a fastboot device.
- Next type following command line to install the CM10.1 kernel and again hit the enter key.
fastboot flash boot boot.img
- If you can see the following screenshot type message, you have successfully installed the kernel. Yes, still this upgrade not completed.

- Disconnect phone from your computer and power On.
- When it booting, you can see the first boot logo. Now press and release the “Volume Down” key several time to boot into the recovery mode. Sometime after installing the kernel, phone automatically boots into the recovery.
- First it’s better make an nAndroid backup. In case if you need to go back to the old ROM, then you can use nAndroid backup. Go to “backup and restore>backup”. After it completed go back to the recovery main menu.
- Then go to “wipe data/factory reset> Yes – Wipe data”. When you’re installing CM10.1 on your Xperia Ray, you have to wipe data. But when you are updating the ROM, this is an optional step.
- Next navigate to “wipe cache partition> Yes – Wipe cache”.
- Go to “Advanced>Wipe dalvik-cache>Yes – Wipe cache”.
- Now go to the “install zip from sdcard>Choose zip from sdcard” and select the copied ROM zip file. To start Android 4.2.2 ROM installation on Xperia Ray select “Yes – Install”.
- Once it’s installed, again select Choose zip from sdcard and browse the copied Gapps zip file and install it.
- Now we can reboot the phone. Go to the CWM based recovery main menu and select “reboot system now”. First boot takes several minutes.
- After the phone booted up, log-in to the Google play store and re-download all the necessary apps. Restore backup apk files not recommend.
- When you’re updating the ROM, you have to again install that ROM zip file contains the kernel (boot.img). Also you have to install Gapps zip file ( no need to re-download it). But you don’t need to follow “Wipe data/factory reset” step.
[Via: XDA forum]
Related posts.
- Install Android 4.1.2 Jelly Bean CM10 Custom ROM For Sony Xperia Ray.
- How To Install AOKP Android 4.1.2 Jelly Bean Sony Xperia Ray ST18i ROM.
- Increase Sony Xperia Arc, Arc S Internal Memory Without Losing Performance.
- Schedule, Customize Android Ringing And Automate Phone With RingTime App.
- Sony Xperia Neo L MT25 Android 4.1.2 Jelly Bean ParanoidAndroid.


