


Rooting Motorola Droid Razr easier. Last year December this phone received Android 4.1.2 jelly bean firmware update. Now you can root your Droid Razr just one click with Windows, Mac and Linux computer.
This method we need to install the adb driver on your computer. You can use PadNet based quick ADB installation method. If you followed our manual update you may not lost the root permission.
Droid Razr rooting method will install SuperUser app, SU binary and Busybox on your phone. After it completed, you can update the busybox using busybox installer app on the Play store. This method developed by the DroidRazr forum “djrbliss“.
Warning!
Rooting void the warranty. If your phone brick or malfunction by following this tutorial, I can’t claim its damages. Applying this guide at your own risk.
Requirements.
- Charge the battery minimum 60%.
- Better backup and well sync internal memory.
- Install ADB driver.
Downloads.
- Root toolkit for Windows in here, Mac in here, Linux in here.
Root Motorola Droid Razr with Windows, Mac, Linux computer.
Following steps only for the Windows computer.
- Extract the downloaded root toolkit to the desktop separate folder.
- Exit all the application on your computer that can make a connection with your phone. Also make sure that they are not running in the notification area.
- Enable USB debugging on your phone, you can enable it on “Settings>Developer options” and tick “USB debugging”.
- Make sure that your phone is not in the mass storage mode [Drag the status bar to the down, tap on the “Connected as a media device”. Next USB computer connection window tick “Camera (PTP)].
- Install “Smart Action application” on your phone and make sure that it is working properly.
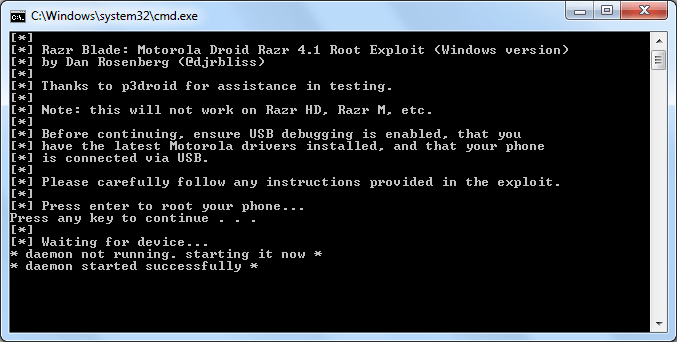
- Double click the extracted toolkit contain “run.bat” file.
- Now you can see the Windows command prompt. It will say hit any key to continue. Yes just follow its instructions.
- Once the rooting completed, your phone will be automatically reboot.
- After that on your phone open the “Smart Actions” application.
- Tap its “Get Started” option.
- Select “Battery Saver”.
- Then tap “Save”.
- Press the “Home” button.
- After that press any key on your computer to continue the root.
- Again your phone will be reboot. You can see some files push message in the command window.
- When the root complete it will show “[*] Exploit complete!” confirm message, now disconnect phone from the PC. When I’m testing this method, my phone rebooted 4 times.
- Congratulation, you have just completed the Droid Razr root.
[via:Droidrzr forum]
Related posts.
- Handy Note advance note taking App for Android [ paid ].
- How to send & save web pages Android Phone, tablets for Read Later [Pocket] [with computer].
- Install Sony Xperia pro, Xperia Mini Pro Cyanogenmod 10 Android 4.1.2 Jelly Bean Extended ROM [MK16i/MK16a,SK17i/SK17a].
- Google Chrome Beta Channel App For Android Now Available Play Store.
- Freelancers New Jobs Search Free Android App [ ODESK.com, Freelancer.com, Elance.com Etc] Free.
![How To Root LG Optimus 3D MAX P720, MAX P725 And CUBE SU870 One Click [ Windows, Mac, Linux ]](https://www.androidgadgematic.com/wp-content/uploads/2012/10/2012-10-23_1926.png "How To Root LG Optimus 3D MAX P720, MAX P725 And CUBE SU870 One Click [ Windows, Mac, Linux ]")

 And Flash Clockwork Mod Recovery")
")