


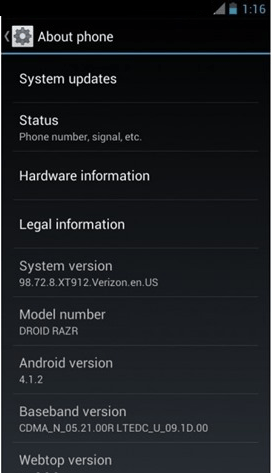
How to manually install or update official Android 4.1.2 jelly bean firmware Motorola Droid RAZR XT912 Verizon? Is that you search? Yes using, this step by step guide you can update your Droid RAZR XT912. Motorola released this new firmware update 25th of December.
This installation we need the stock recovery, if you’re in the custom one, you can go back to the stock recovery using end of this post tutorial. However, this tutorial can apply rooted and unrooted devices without any issue.
Warning!
- After installed the jelly bean updates, you can’t go back to the ICS. So keep it in your mind.
- This update only for the Motorola Droid RAZR XT912 Verizon version.
- Applying this tutorial at your own risk. If your phone brick or damage by following this tutorial I can’t claim its damages.
Download.
- Firmware update zip file in here.
- Stock recovery rollback toolkit in here. (Mattlgroff’s RAZR Utility v1.82)
How to manually update/ install Motorola Droid RAZR to official Android 4.1.2 Jelly Bean Firmware Update.
- Install the OTA RootKeeper app from the Google play store in here.
- Connect your phone to the PC via USB cable and copy the downloaded firmware update zip file to the SD card. (Don’t copy it to the inside of the folder)
- Open the OTA RootKeeper app and and tick “Protect Root“.
- When the superUSer app request the permission, tap “Grant”.
- Next tap “Temp Unroot“.
- Boot into the bootloader mode. To do that, power off the phone and wait for a few seconds.
- Press and hold the “Power button, Volume down” keys at the same time.
- When the screen on, release the pressed keys and press “Power, Volume up and down” keys.
- In the bootloader mode, select the recovery option by using “Volume down” key and select it by pressing “Volume Up”.
- Next when you see the android logo, press Volume up and down keys at the same time.
- Now you’re in the stock recovery.
- Select “install update from external sdcard” using volume keys and choose the downloaded zip file using the power button.
- Installation will take more than 20 minutes and you can see the installation progress.
- When it display “Install from SD completed”.
- Press “Power button” to reboot the phone.
- Once phone bootup, open the “OTA Rootkeeper” app.
- Tap “Restore Root” button.
- Congratulation, now you have android 4.1.2 jelly bean rooted firmware on your Droid RAZR.
How to rollback to the stock recovery.
- Connect your phone to the PC via USB cable.
- Boot into the fastboot mode. First power off the phone and press and holding volume and power button at once.
- Extract the downloaded “Droid Razr toolkit” zip file to the desktop.
- Double click on the “DroidRAZRUtility.bat file” file.
- Now you can see the Windows CMD, type 1 in your keyboard.
- Now the stock firmware installation will start.
- Now you’re in the stock.
- Change the “USB connection mode” to “MTP”.
- Enable USB debugging (Settings>Developer options).
- After the ICS firmware installation, we have to root the phone for install OTA rootkeeper app.
- Again double click on the “DroidRAZRUtility.bat” and select the option 2 .
- Wait for a few seconds to finish the rooting.
- Once it completed reboot the phone.
- You can now follow the above firmware installation.
Related posts.
- Schedule, customize Android ringing and automate phone with RingTime App [ Free & Paid ].
- Download & install Android 4.2 camera, gallery, keyboard ICS android 4.0.4 & 4.1 ROM.
- The aest anti-theft tracking app for android Cerberus.
- Handy Note advance note taking App for Android [ paid ].
- Free download TapaTalk HD beta from Play Store [Tablet optimized version].
- How to send & save web pages Android Phone, tablets for Read Later [Pocket] [with computer].