


Android 4.1 jelly bean based ParanoidAndroid hybrid custom ROM now available for the Sony Xperia Mini, Xperia Mini Pro, Live With Walkman, Active hands sets. Paranoid Android ROM is a hybrid ROM which based on the cyanogenmod 10. Its interface looks like a tablet view, but it’s not a tablet ROM.
This ROM mainly useful for larger screen devices, however now you can use it small Sony Xperia devices. Paranoid Android requires use own custom kernel, so that you have to unlock the boot loader and flash the recommended kernel inside the zip file. This is not Paranoid Android team official release its developed the XDA member singh_dd93. This PA ROM installation wipe all the user data. You can follow this tutorial backup tutorial.
Warning!
Installing custom ROM voids the warranty of your Sony Xperia phone. If your phone brick by following this tutorial, I can’t claim its damages. Applying this tutorial, at your own risk.

Requirements.
- Unlock the bootloader. [ Guide in here ]
- Charge the phone minimum 50%.
- Backup and sync contacts, SMS, call logs, etc. [ with root| without root ]
- Install the ADB driver [ Guide in here ].
Downloads.
How to install Android 4.1.2 ParanoidAndroid Jelly Bean ROM Sony Xperia Mini, Mini Pro, Live With Walkman, Active.
- First download Gapps and your phone ParanoidAndroid ROM using the above link.
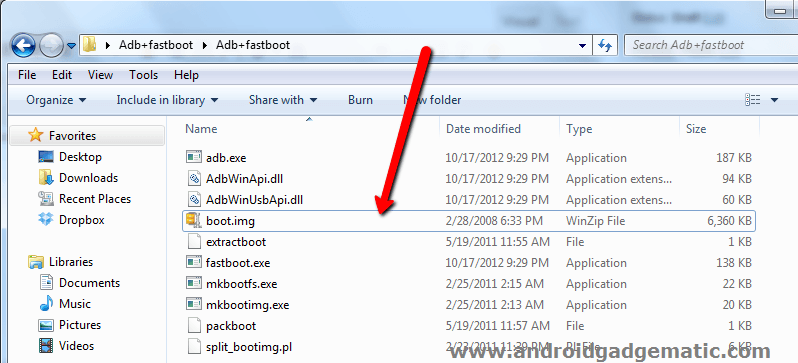
- Extract the downloaded ROM contain “boot.img” kernel file to the desktop. If the kernel has another name; rename it as “boot.img” (for easily install via fastboot).
- Copy Gapps zip file and ROM zip file into your phone’s SD card.
- Power off the phone and wait for a few seconds.
- Now we need to flash the kernel. To do that we have to enable fastboot mode.
- Press and hold the volume up key and same time connect your phone to the computer via USB cable.
- When the top LED turn to blue your in the fastboot mode. If the drivers installation start wait until it’s complete.
- Extract the downloaded fatboot zip file to your desktop and copy downloaded kernel file (boot.img) into the fastboot folder.
- Press and hold the “Shift” key on your keyboard and same time right click inside the fastboot folder.
- In the windows context menu click “Open command window here”.
- Now you can see the Windows CMD window, type /copy paste following command line the the CMD window.
fastboot flash boot boot.img
- When it displays “installation completed” or similar message disconnect phone from the PC and reboot.

- When you see the “Free Xperia Project” kernel bootlogo and top LED turn to blue press “Volume UP” key few times to boot into recovery.
- In the recovery mode you have to use your phone’s volume keys for navigation and home button for selection. Touch mode not available.
- First we need to make a full ROM backup. To do that go to “backup and restore>backup”. Wait for a few minutes to complete the backing up process.
- In the recovery mode go to”Wipe data/factory reset>Yes Delete all user data”.
- Navigate to the “Mount and storage>Format System>Yes delete”.
- Go to “Advanced>Wipe Dalvik cache>Yes Delete cache”
- Now we can start the ParanoidAndroid ROM installation. Go to “Install zip form the sd card>Choose zip from the sd card” and select the downloaded “ParanoidAndroid ROM zip file on your SD card.
- Wait for a few minutes to complete the installation.
- When it’s completed again install the downloaded Gapps (Choose zip from sd card and select the zip)
- When it’s finished, go back to the main menu and select “Reboot system now”.
- First boot takes few minutes to complete, its normal.
[ via:XDA forum ]
Related posts.
- Install CyanogenMod 10 on Sony Xperia Mini, Mini Pro, Live With Walkman, Active
- Fix accelerometer, compass revert issues on custom ROM
- Check android phone, tablet sensor work properly
- Calibrate android phone, tablet battery [ no root, with root calibration ]
- Root Samsung Galaxy Ace Plus GT-S7500 without yellow triangle & flash CWW recovery


![CyanogenMod 10 ROM Downloader Free App [ CM10 Downloader ]](https://www.androidgadgematic.com/wp-content/uploads/2012/09/CM10-Downloader.jpg "CyanogenMod 10 ROM Downloader Free App [ CM10 Downloader ]")