


How to root Xperia S LT26i ICS, GB without unlocking bootloader, this is the idea that comes to your mind after you receive this handy phone. After unlocked the bootloader, we lost the DRM keys so that TrackID, video unlimited, etc not available. Now we can easily root our Sony Xperia S without any issue. If you already have unlocked bootloader, you can follow our previous Xperia S rooting guide in here.
This method we need need android v2.3 Gingerbread (GB) stock ROM, currently you’re in the Ice Cream Sandwich (ICS) ROM flash a GB ROM and start the rooting guide. If you need to know how to downgrade to GB you can read our earlier guide in here ( I specially created that, downgrade post for the Xperia 2011 devices, but its the universal method for all the Sony android phone).

Warning!
Rooting void your phone warranty. Applying this method at your own risk. After you follow this guide, you device bricked and you got the boot-loop, you have to pullout the battery. It’s fixed to the back cover, so you have to use a Torx 6 screwdriver and tweezers.
Pre-requirements
- Enable Unknown sources (Settings>Application>Unknown sources).
- Enable USB debugging (Settings>Application>Development>USB debugging).
- Check Stay awake (Setting>Application>Development>Stay awake).
- Adjust screen timeout to 30 minutes (Settings>Display settings>Screen timeout).
- Fully charge the battery.
- Do not use live wallpaper.
- Install android adb drivers (guide in here) (PdaNet method fast)
- Backup the phone (guide in here)
Download
- Download generic CH (1257-3740) Xperia S LT26i ICS ROM (6.1.A.0.452) in here, in here, in here or as torrent.
- Download Gingerbread firmware in here.
- Flashtool in here
- Root toolkit in here
Pre-requirements.
- After download the flashtool install it. After that, install flashtool update kit
- Once flashtool installation complete, close the application for go to the next step. Otherwise next step not work properly.
- To install ROM’s you have to enable fastboot mode. To do that, power off the phone and press and hold the volume down key and same time connect to the PC.
- After every ROM installation completed check USB debugging, unknown sources and screen timeout are not changed.
- Extract downloaded acroHDrootingKit root toolkit.
- If downloaded ROM is a compress one (zip,rar or 7z) extracts it until you receive “.ftf” file
- Copy downloaded “ftf” firmware file in to the flashtool application installed location firmware folder (C:\Flashtool\firmwares)
Rooting procedure.
- Connect the phone to the computer via USB cable. If drivers installation start wait until it’s complete.
- Connect the Xperia S to the computer via USB cable (make sure that you’re on the android v2.3 Gingerbread ROM)
- Don’t close window command prompt until you finished this root process.
Step one.

- Go to the “acroHDrootingKit” folder and press and hold the “Shift” key and same time right click inside the folder. In the Windows context menu click “Open command window here”. Now type “step1” without quote marks in the command window. ( Don’t close the windows CMD window until this process complete).
- Power off the device and disconnect from the PC
- Run the Flashtool on your computer
- After phone fully shut down press and hold the volume down key and same time connect to the PC via USB cable to enable fastboot mode. (top LED lite change to green)
- On the flashtool click “Thunder” symbol button to install the the ROM
- In the “Mode selector” window tick “FlashMode”
- On “Firmware selection window” select the LT26i ROM (6.1.A.0.452) which you copied.
- Now unchecked all these options “Wipe data,Wipe cache,Wipe apps log, Exclude partition”
- Make sure that “No final verification” ticked.
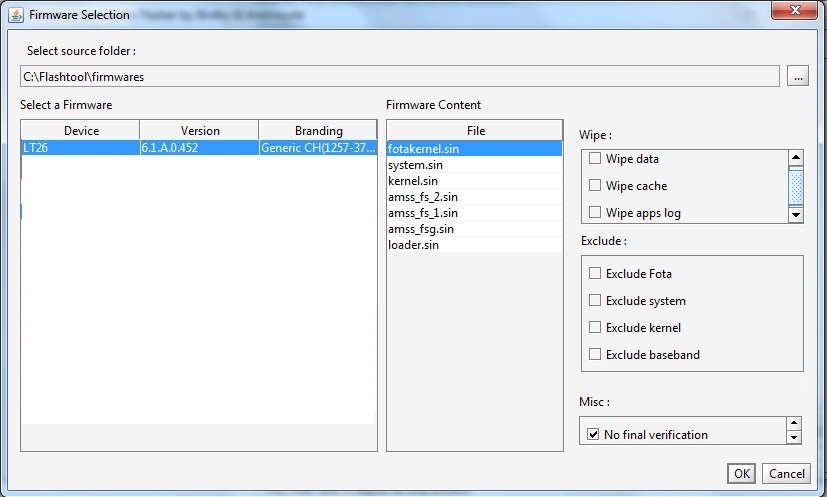
- Now click “OK” to start the flash.
- Once it’s completed close the flashtool and disconnect phone from the computer. If you’re not close it will cause issues in future steps.
Step two.
- Power on the phone and connect the phone to the PC. Make sure that, all the settings not change. After phone fully boot type “step2” in the CMD window without quote marks.
Step three.

- Run the flashtool and install Xperia S Gingerbread or ICS ROM but untick “Wipe data,Wipe cache,Wipe apps log.
- Tick “Exclude partition” and “No final verification”.

- After flashing completed close the flashtool.
- After the phone booted, phone will display some errors, close the error dialog box and leave the phone to start.
- When phone start, connect it to the PC via USB cable and type “step3” in the windows command prompt without quote marks.
Step four.
- Type “step4” in the CMD without quotes. If phone reboot wait until it boot completely.
- After step 4 complete type the “step5”.
Step five.
- Power off the phone
- After phone fully dead, press and hold the volume down key and connect the phone to the computer
- Run the flashtool and install any GB or ICS ROM that you like to use. When the “Firemware selection” window appears check “Wipe data, Wipe cache,Wipe apps log” and under the “Exclude” tick everything, and tick Misc: No final verification. Like following screen shot.

- When installation completed, disconnect the phone from the computer and power on.
- Now almost done, after phone boot enable data or Wi-Fi and go to the Play Store and install “SuperUser” app and run it. After that install the “BusyBox”.
- Download SuperUser app via web browser, via play store app or scan QR code.

- Install BusyBox app via web browser, via play store app or scan QR code.


![How To Easily Root Any Android Phone, Tablet One Click [ Fast, Easiest, Secure ]](https://www.androidgadgematic.com/wp-content/uploads/2012/02/Root1.png "How To Easily Root Any Android Phone, Tablet One Click [ Fast, Easiest, Secure ]")
)