


Google introduced a second step verification for maximizing your Google account security. There are many reasons to use this 2nd verification. Your credit card numbers are on your Google wallet, your emails are on your Gmail account. If someone theft those things, your confidential data will expose and you’re in big trouble.
After we enabled two-step verification, it will generate 4 number code. You can get that code using either the Google Authenticator app or using SMS text message options. Google Authenticator app available for only Android and iOS devices.
If you don’t have that device, then you can select an SMS text message. Authenticator app generates new code every 60 seconds (1 minute). After you submit your log-in details and proceed with the log-in, next page you can see the submit verification code.
However, if you use 3rd party log-in such as email clients or Android device, then you have to generate the Application-specific password. In this post, I added all the necessary information that you need to know.

Table of Contents
How to enable Google’s second verification method.
- First, you have to log-in to your Google account. Then go to the account page here.
- Left side you can see an option called “Security”.

- Under the “2-step verification” click its “Settings” button.

- Next page, click “Start setup >>” button.

- Then type your mobile phone number.
- Now Google will send a verification code to your mobile.
- Submit that number and click the “Verify” button.
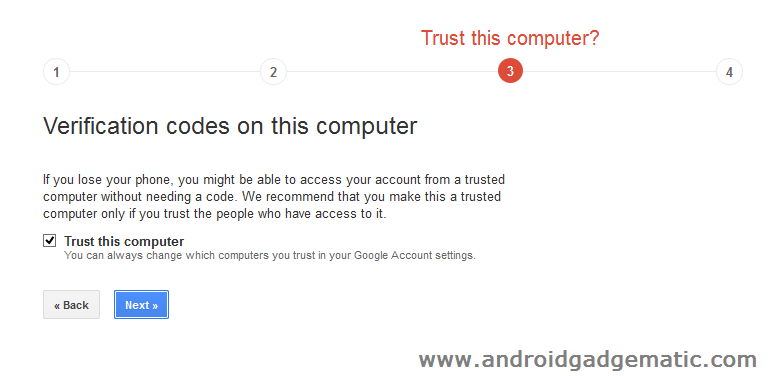
- Next page makes sure the “Trust this computer” option checked then click “Next” and again click the “Confirm” button.
- Now we are almost done. It’s recommended to generate a backup code and save it on your computer or some other secure place. If you fail to submit code (via the app or text message), then you can use that backup code.
- If you like to receive your Google 2nd verification to your mobile, you don’t need to go to the next step. If you like to generate your code on your Android, iOS, or Blackberry phone/tablet, you can go for the next step.
How to use Google 2nd step verification mobile app.
- Download Google Authenticator app [Android | iPhone].
- Go to the Google account.
- Google account>Security>2-step verification>Settings.
- Submit your password.
- Now you are on the “How to receive codes” page.
- Under the “Mobile application” click your device OS. If you have Android click the “Android” link.

- Now you can see a popup menu.
- Open the installed Google Authenticator app.
- In the app touch the “menu” key on your phone and select “Set up an account.”.
- Next, select “Scan a barcode”.
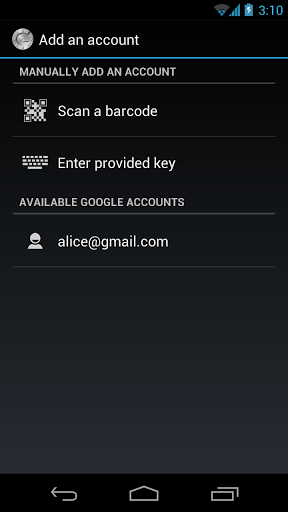
- Using your phone’s camera scan the QR code.
- Now it generates a 6 number code.

- Submit it in the 7th step opened popup menu code box.
- Click the Verify button.
- If you got a “Google Authenticator setup successful” message or something similar message. You have done it.
- Now Google Authenticator app generates code as the primary source. Every 60 seconds this app generates new code. Whenever you log-in to your account, you have to open the app and submit that code.

How to generate an Application-specific password.
After you enable 2-step verification you have to generate application-specific passwords for certain applications such as Desktop email clients, Android phone Google account login, Chrome Sync, etc. When you use that type of application, you don’t need to submit your password. Instead of that, you have to use an application-specific password. It’s more secure.
- Go to the Google account setting page
- Navigate to the Security.
- Now under the “2-step verification” click “Settings”.

- Submit your password to go to the next page.
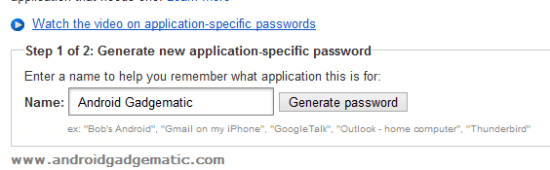
- Under the “Application-specific passwords” click the “Manage application-specific passwords” link.

- Under “Step 1 of 2: Generate new application-specific password” type, suitable name in the “Name: ” box and click the “Generate password” button.
- Now you can see 16 digits password. It’s your application-specific password. When you use Android log-in, application log-in you have to submit that 16 digits password. After submitting it click the “Done” button.
- Now copy the generated password and submits it to your application and click “Done”.


After that, if you sign-in to your Google account, you have to submit a verification code that is sent to your mobile phone. If it’s not receiving then you can use backup codes.
After enabling this security step you can’t use your real password for some applications such as email clients. At that time you had to use an application-specific password for that.
![How To Sync iTunes Library Music Playlist With Android Phone [Windows, Mac PC]](https://www.androidgadgematic.com/wp-content/uploads/2012/07/2012-07-16_1042.png "How To Sync iTunes Library Music Playlist With Android Phone [Windows, Mac PC]")


 Step Verification And App Password)